

Benefit Cosmetics BTS Part 2: Shooting + Post
Hey guys! Hope your Friday is going well. We had our Halloween "Company Party" yesterday and all three of us (Elle, Kirsten, and I) were different versions of Michael Scott from The Office. Haha! We even had a whole little photoshoot just for our costumes. It was AMAZING. Anyway, I hope that you guys had a chance to read Elle's Part 1 of this Benefit behind-the-scenes post. She went over all of the pre-production including the fun sets she created specifically for this shoot. It was honestly amazing and I'm almost positive this was the first time she created a checkered pattern as well as a really unique whack-a-mole set up where she cut out stars for a GIF. Haven't checked that out yet? Head on over there and meet me back here when you're finished. Alright, let's dive in shall we?
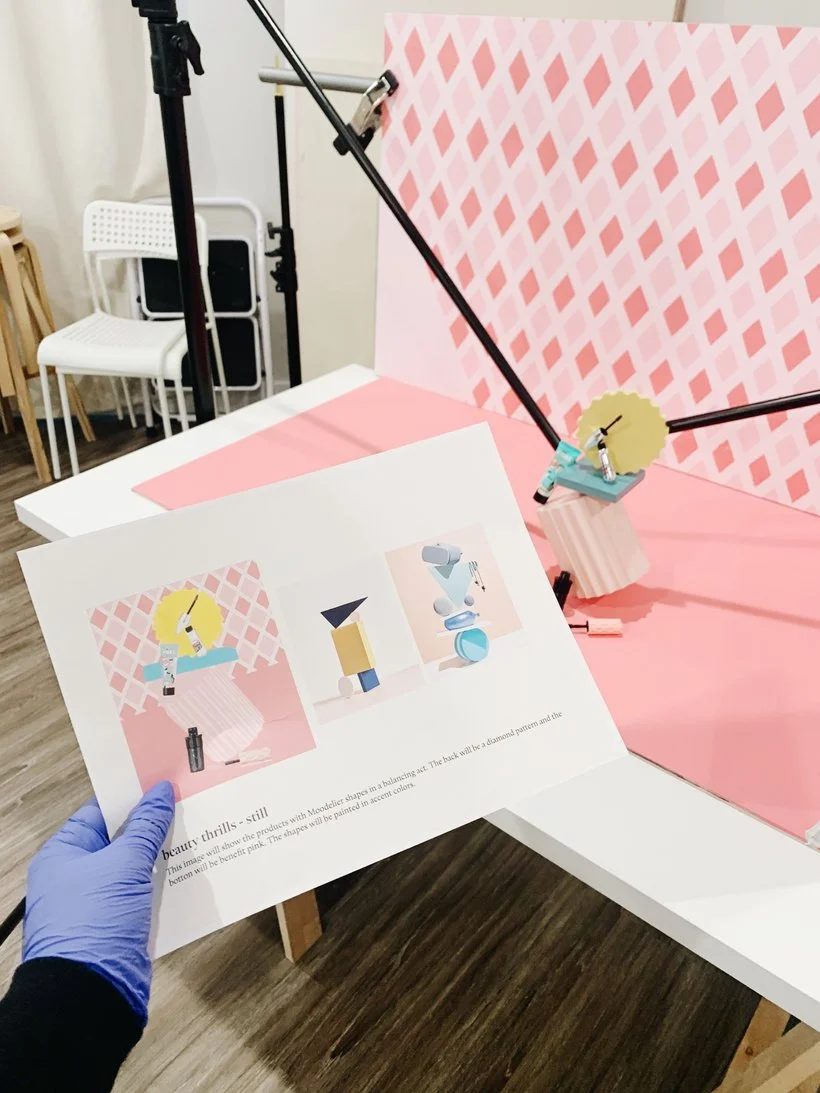
Quick note: This was the first shoot that we actually implemented digital mockups into our shoot plan. Elle had created journal sketches to plan individual shots for a past shoot with Blume but if I'm not mistaken this Benefit shoot was the first time Elle presented DIGITAL mockups to our client for approval. Not only did that make us look very professional but I truly believe that it led to us having a very successful and streamlined shoot. Having these digital mockups helped us to focus our time and energy on lighting and troubleshooting to figure out the best way to get the shots and capture the GIFs. It was honestly transformative and I wouldn't be saying that if I didn't believe it. If you're interested in checking out a downloadable template version of the shoot plan and proposal deck we used to send to Benefit, check them out here in our shop.
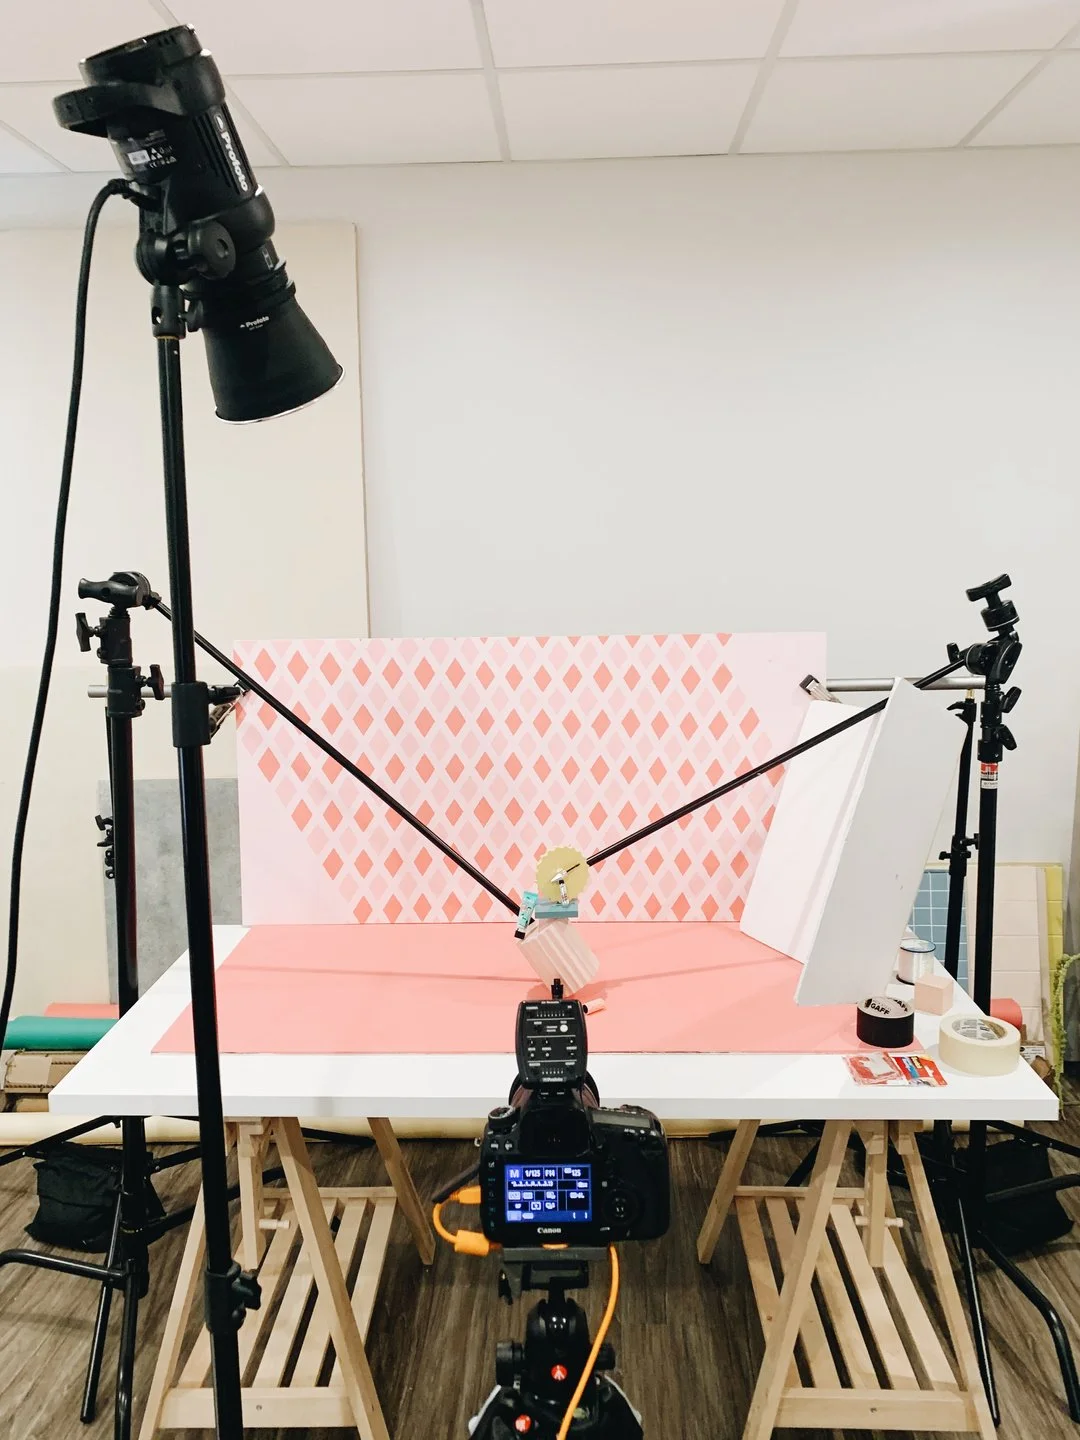
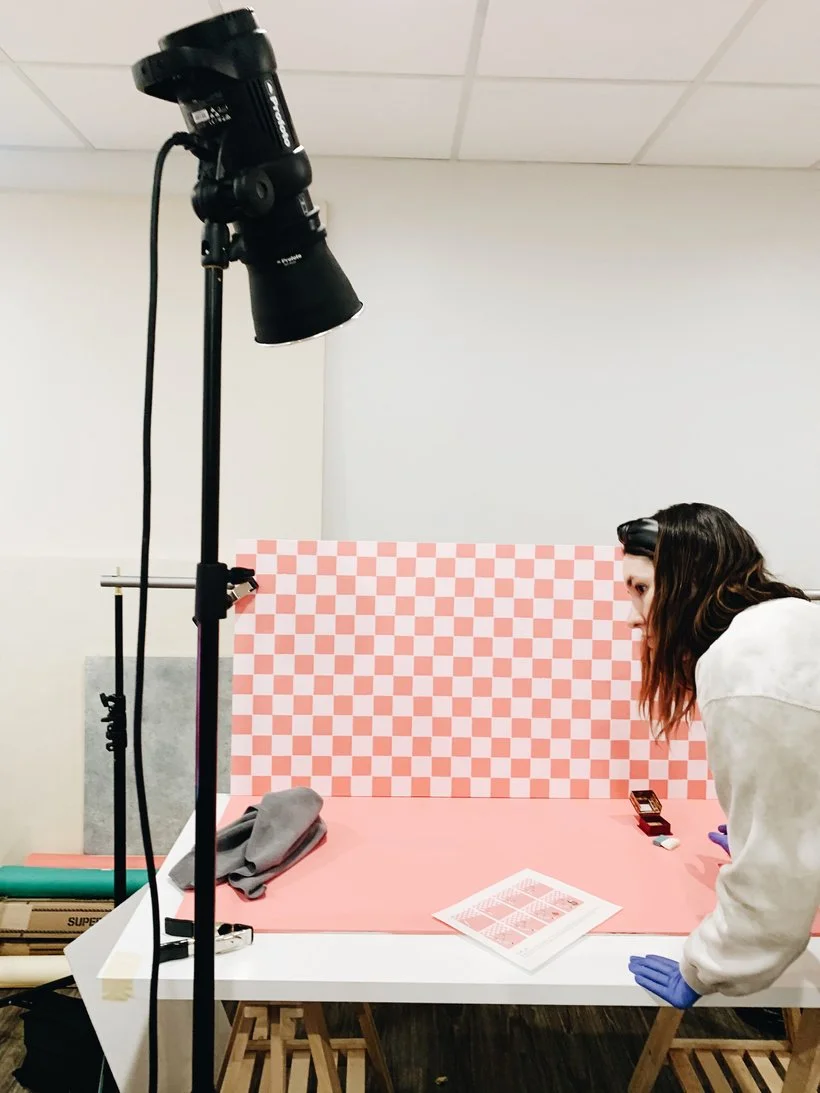
Ok, so shooting for Benefit was a total blast. Not only because it was Benefit (the middle schooler in me freaked out tbh) but because we literally got to play with so much color and the concepts were just so fun. We produced a total of 2 images and 3 GIFs. Our client was super stoked about wanting to use Moodelier for the whole shoot so Elle planned all of that out ahead of time to make sure that the shapes accented all of their products in the best way possible. It's honestly no surprise that we went with our usual one Profoto strobe light setup and a simple white card for the lighting. We just love the hard light look and really enjoy how much the shadows play a unique role in our work. It's actually quite interesting that we don't typically "plan" to shoot in hard light. It's almost as if it's an unwritten rule between Elle and I. Therefore, it's usually the lighting that becomes the thing we troubleshoot the most aside from the super complex concepts that require rigs or c-stands.
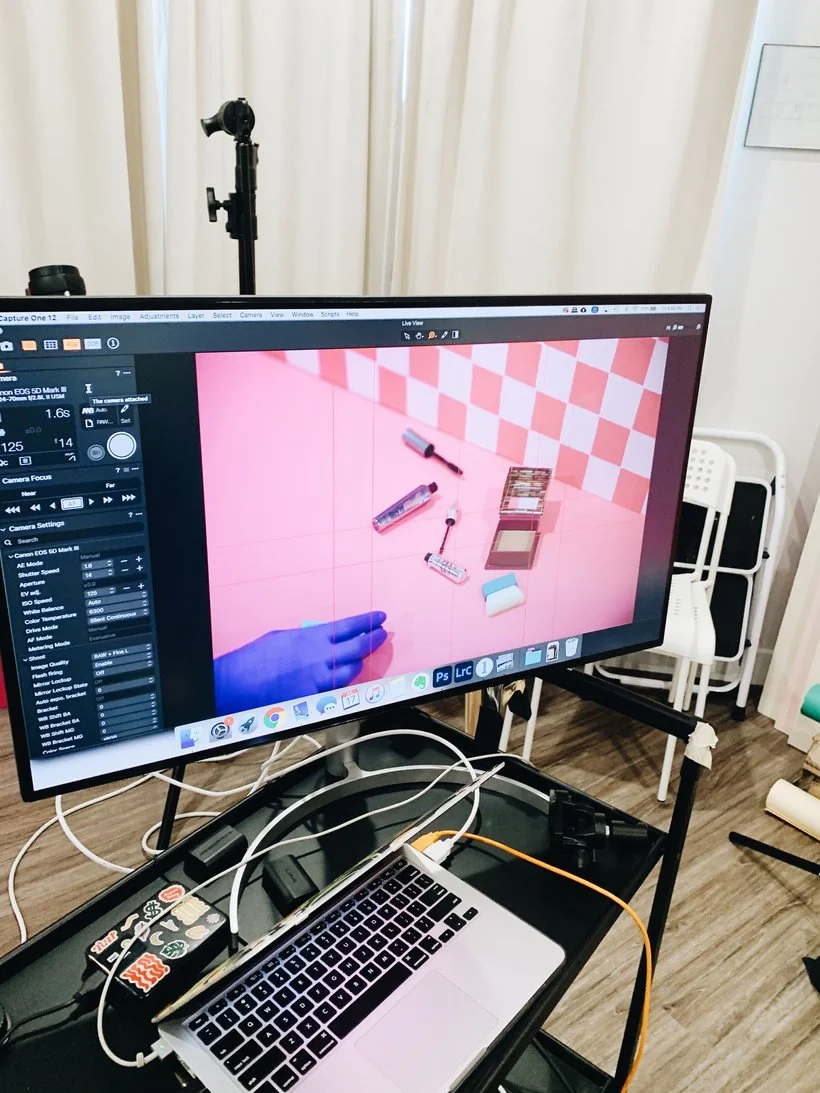
We definitely tethered this entire thing using Capture One. Seriously... If you haven't checked this program out, you absolutely should. Oh, and if you watched our Capture One video course, then you'll know exactly why we love it so much. The reason I bring this up is because the client requested that each of the images and GIFs should be created with the intention that they could be cropped as a square, a 4x5, and a 16x9. At first, I was like, WTF. That's sort of impossible. But thankfully, with Elle's careful planning and Capture One's overlay feature that allowed us to upload a PNG with all three crops, we managed to make it work. We used our Canon 5D Mark III and our Canon 24-70 2.8 lens to shoot everything and our settings were kept pretty basic. We usually stick to an ISO of 125, a 1/125 shutter speed, and an aperture of f/14.
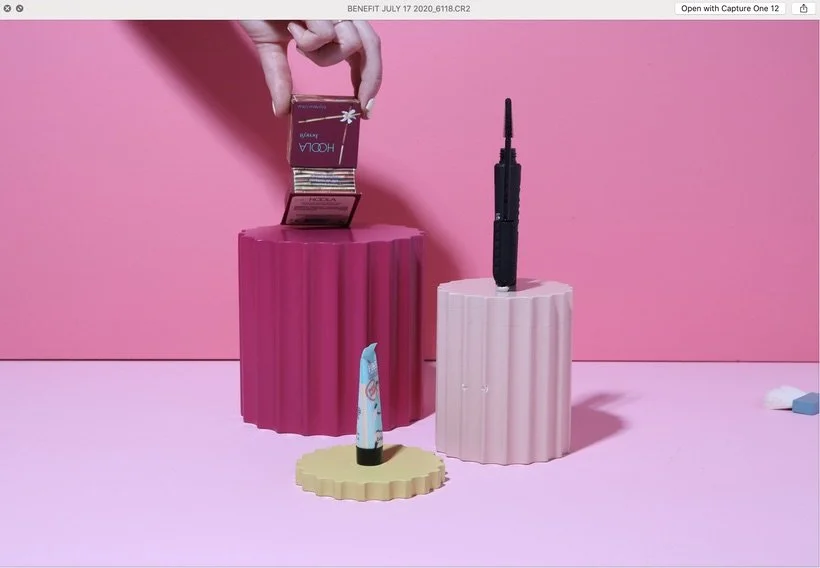
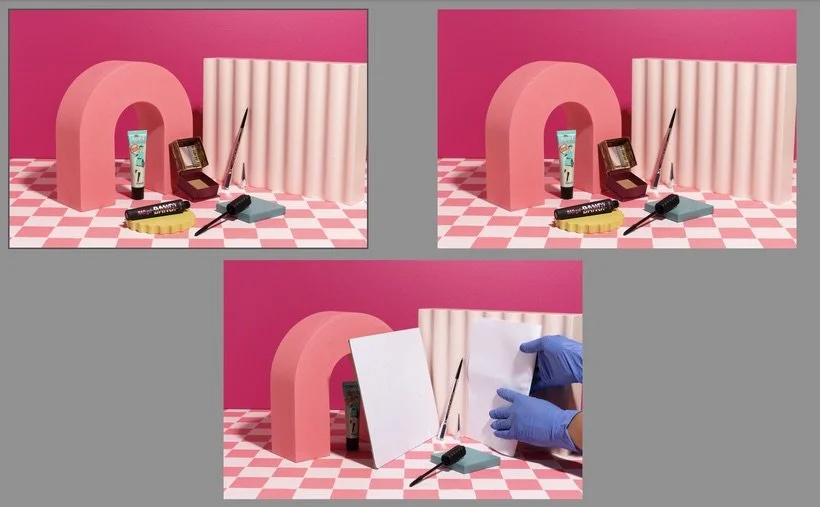
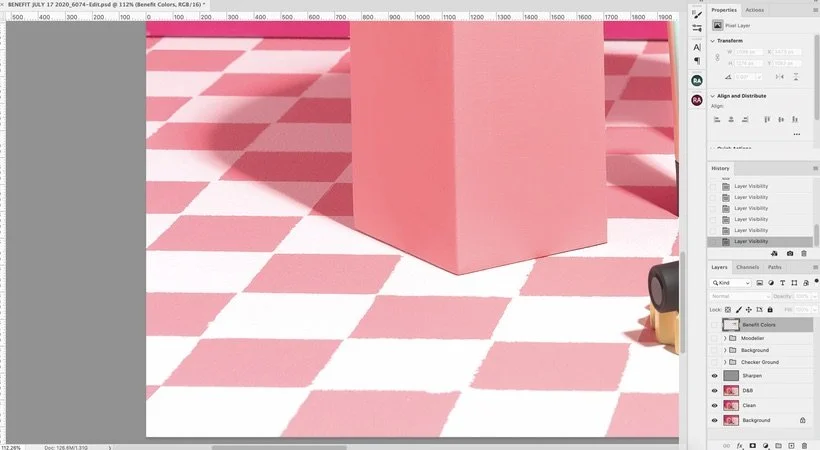
Styling this shoot was so much easier thanks to Elle's mockups but we did have a tough time with how we were going to balance all of the shapes and products in our first shot. Check out the image below to see what I mean! We ended up going with our trusty c-stands to help us lean the Moodelier pieces by taping them from the back while using putty to help prop up some of the products. This was probably the hardest shot to troubleshoot but once we got it to work, we were super happy with it. We also made sure to use a small piece of paper or a smaller white card to help illuminate the reflective Gimme Brow+.

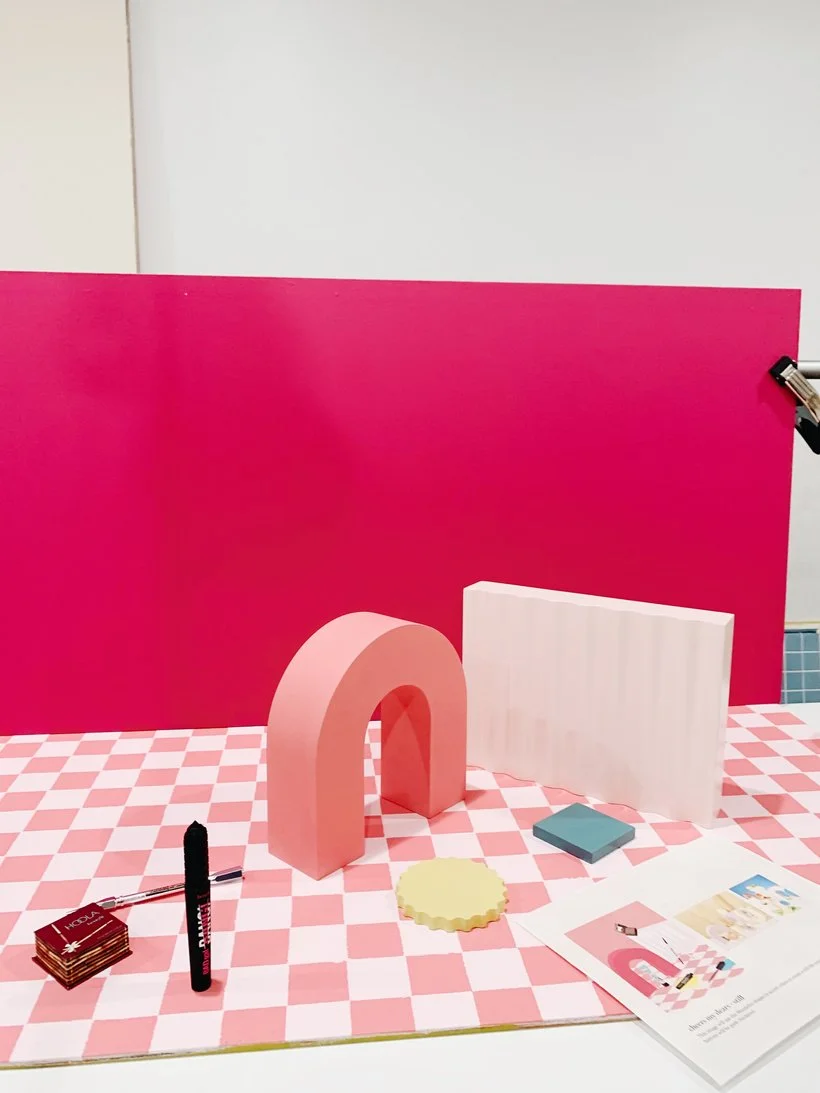
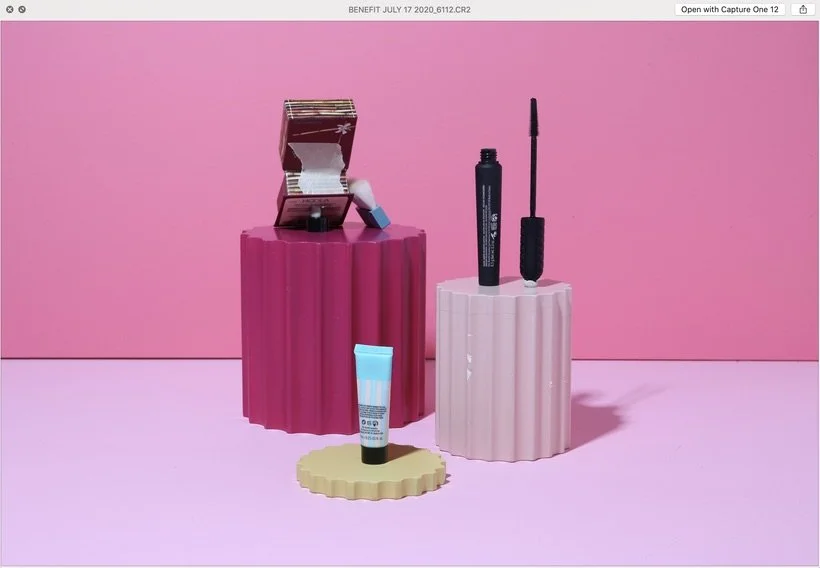
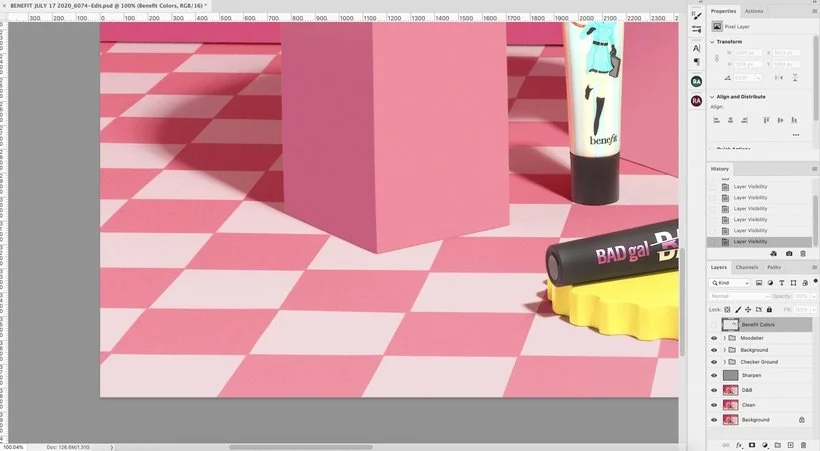
The next shot we set up was sort of a breeze. It honestly helps to have such amazing props like Moodelier's pieces to really bring the image to life. We did end up making a small change to this shot that was something both us and our client felt was the right move. Initially, our mockup had the bronzer placed on top of the wavy shape but it felt way too separated from the rest of the products so we brought it down and adjusted the scene accordingly. As much as we all might dislike when a client suggests a change, sometimes it can be a blessing to have them review the shots after we compose them because they know their brand best and usually can give some pretty great feedback. At the end of the day, you want your client to be your creative partner. Yes, they hired you to produce the work and make these creative decisions but at the same time, the work almost always comes out better when you work together. Sorry that rhymed and sorry that it was cheesy but it's true. Lol!
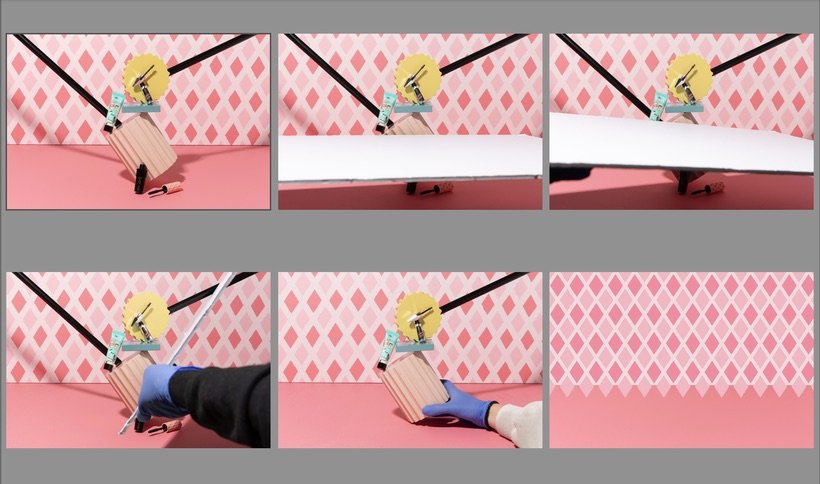
The next setup was the first GIF of three which included Moodelier's fluted column bundle. The products were placed on each shape and the movement was for each column to rotate completely and in a different direction from the one next to it. We used putty to prop up the mascara and a tube cap from one of the other products to hold up the bronzer. We also used tape to keep the bronzer open. It was precarious ya'll. One issue we ran into when shooting this GIF was the fact that all of the columns didn't look like they were actually moving because while we knew we were definitely rotating them, they didn't look like it in the images. In order to solve this issue, we used the overlay feature in Capture One to place the image we captured before the next one to make sure the ridges of each column didn't align so that the shapes would actually look like they were moving. By doing this, we also were making sure that we didn't accidentally move the columns away from where they were supposed to be. I just want to say, it was also pretty difficult trying to remember which of the props were rotating in which direction because each frame took a good 5 minutes to set up so we would forget and ended up just shooting it all over again just for safe measure. The last thing we shot for this GIF was actually Elle holding the bronzer to capture the same angle/placement so that I could have a clean back of the product to composite later that didn't have the tape on it. See screenshots below.
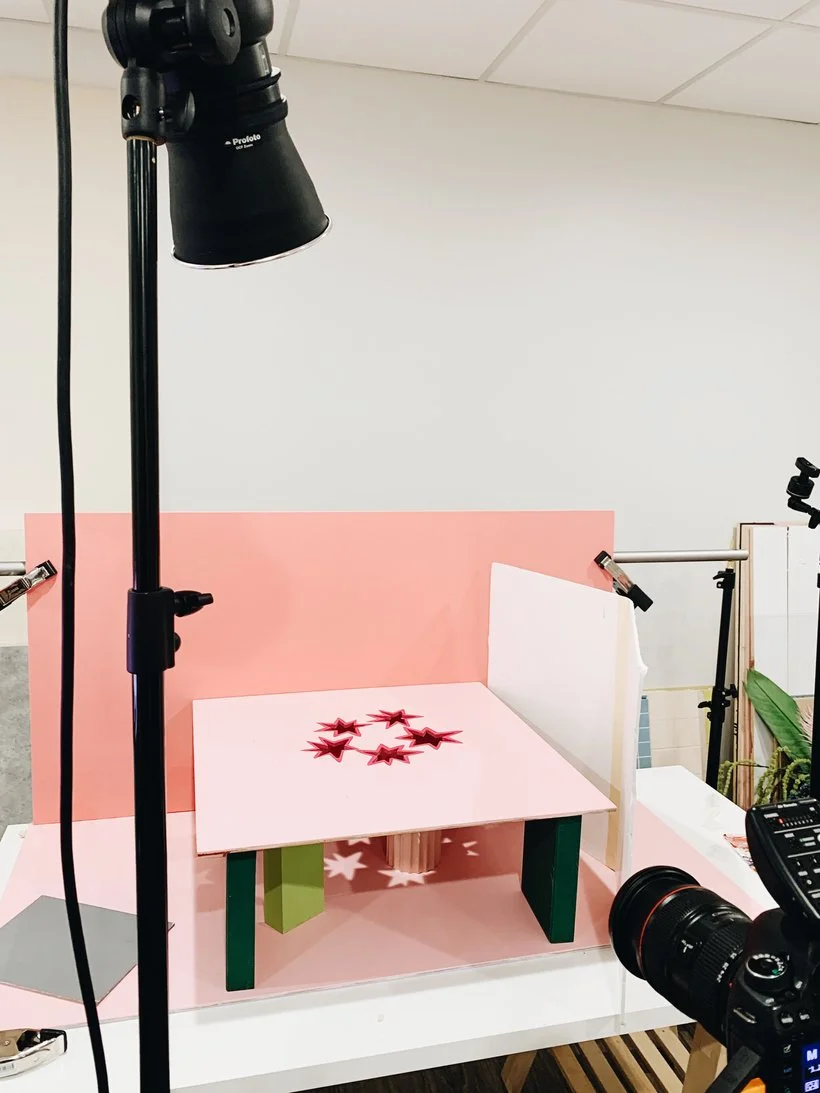
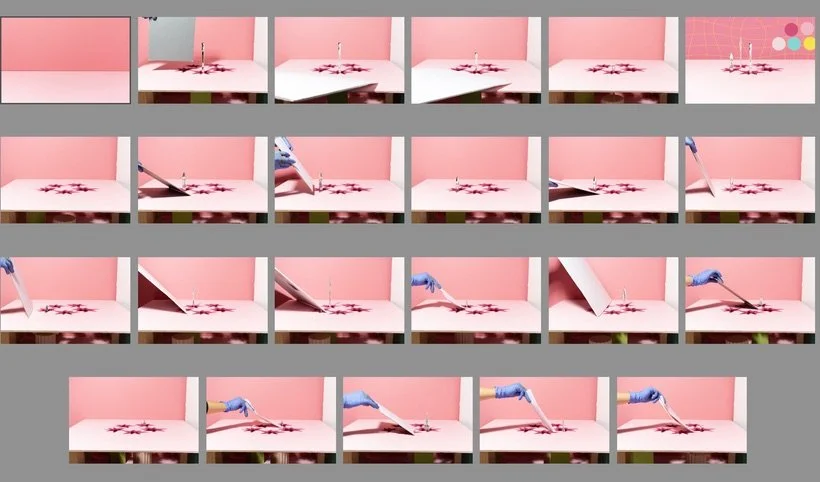
As for GIF #2, the idea for this one was to use the fun whack-a-mole setup that Elle created to quite literally "show" the products popping out from the star cutouts. So we used a few boxes to elevate the particle board with the star shapes and then used random props to rise each of the products. We kept the movements pretty minimal and giving each product 3 frames to work with. We proceeded to capture each product at 1/3rd of it coming out, then at 2/3rds, and then completely fully revealed. We knew that we didn't really need to shoot any of these frames in order because it was just going to be a whole photoshop masterpiece where I could just choose which products needed to pop out in whatever order/fashion I wanted. Again, we used some white cards to help illuminate all of the products since they were all reflective. This GIF went a lot smoother since there really wasn't any issues and the squiggle background that we had in our mockup was going to be done in post.

Finally, we made it to our 3rd and final GIF. This one was probably the easiest stylistically but took equally as long because we had to shoot every single product moving into the scene individually and eventually all of the products would be in the set with the final movement being that some of the product from the primer tube would spill out. Elle planned where she wanted all of the products to end up by making small pencil marks on the painted board. From there, we captured each movement while also using a white card to help illuminate some of those reflective objects. I believe we may have done two full runs of the entire thing except the final squeezing out of the product because we wanted to make sure we were super happy with the placements before ruining the set.
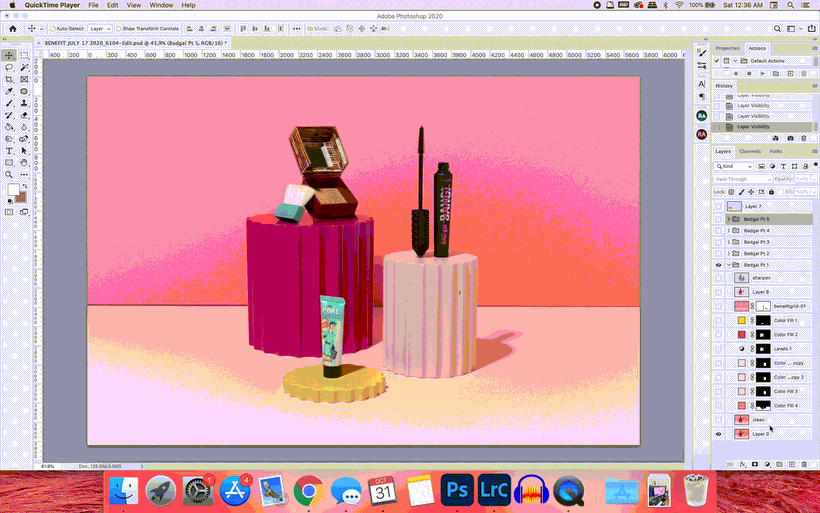
The entire shoot lasted almost a full day. We got started with setup at 9am and finished around 4pm. I can't tell you how excited both Elle and I were to have worked on this project but of course the work was not yet over. I'm not joking when I say that this project was one of the most stressful and exciting editing projects for me to date. I spent an insane # of hours editing it all. If I remember correctly, we had several projects all very close together that month and we had also just started recording our podcast, Per Our Last Email, so I didn't have as much editing time as I normally would have. My point is, I actually remember coming to work at 7am for quite a few days to maximize my time because I knew how crazy the post-production was going to be. You can ask Elle about that. Usually she's the early bird and I just roll into the studio between 10am-11am. Haha! I honestly probably also worked on the weekends because there was just no way. For reference, I spent almost a whole two days on this still with the checkered pattern on the bottom.
So yeah, it was a WILD project. For starters, I had to adjust the color for every Moodelier piece because our client was sort of a stickler about all of the colors and even gave us hex codes for us to match it to them. So you can imagine how much time I spent making clean selections for every prop (and from every frame if it was a GIF.) On top of that, this project was the first project in which I ran into a problem with color profiles. Before that, I had never even cared to notice what color profile I was working in. Crazy right? You learn on the job ya'll! Anyway, when Elle created the squiggly pattern for me in Illustrator and transferred it over to me, it was appearing in some wacky colors and then I did a ton of research to figure out why that was and we were just working in different color profiles so I had to switch my preferences to make sure I was working in sRGB since that color profile is primarily for web use. It was quite the adventure especially because it took almost a half day to troubleshoot this problem and I had to go back into the already edited projects and readjust all of the colors. Thank goodness for non-destructive editing, am I right?
Anyway, everything about this project was tedious as heck including dust retouching, cleaning up all of the patterns and backgrounds, adjusting all the prop colors, compositing all of the reflective products, fixing all of the products, compositing any of the products that were being held up with putty, tape, or random objects, recreating the diamond pattern in Photoshop, and SO. MUCH. MORE. It was crazy you guys! So much intense troubleshooting when it came to the post-production but totally worth it because I learned so many new ways of editing a particular thing or background as one does with every project.
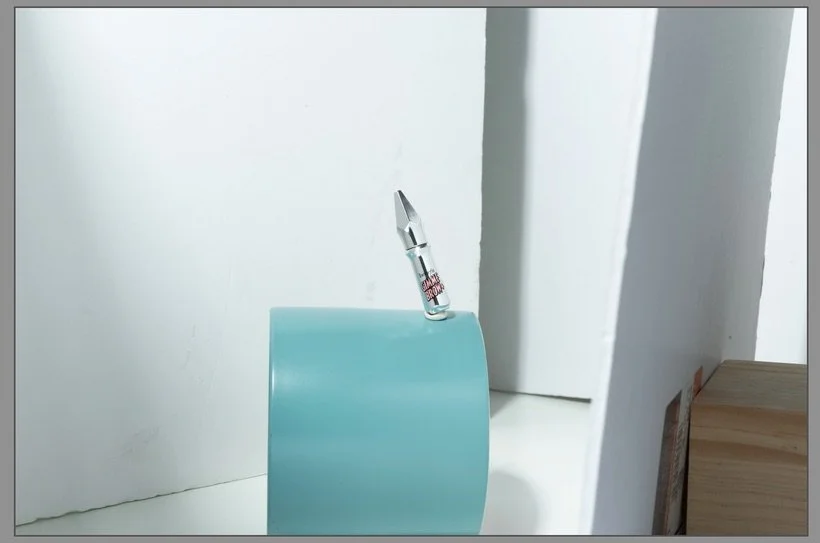
This was the first time I had cleaned up a checkered pattern before which if you read Elle's post, you'd know that it wasn't perfect but thankfully she's switched to a new tape recently and that's worked a WHOLE lot better. A couple random things that come to mind about editing this project was the whack-a-mole GIF and the balancing shot. I actually had a bit of a hard time trying to figure out how I wanted the products to pop out and if I wanted them to pop out simultaneously or one at a time in the GIF. It took at least a few hours or so to just put frames all together and test out a few different combinations to see what looked best. As for the balancing shot, I wasn't 100% sure I really liked how I illuminated the reflective product so I actually set up my camera, lighting and tethering, and took another shot on my own of just the same product on a teal planter that we had laying around that matched the color really well. You guys catch my drift yet? It was a very difficult editing job but overall so proud of Elle and I. Below are some screenshots of the images out of camera, parts of the editing process, and some other fun little bits.
*All of the editing for ONE frame. And then I had to do it all over again for the next 4 frames.*
This shoot was for sure the first project where I felt like we really produced and edited a cohesive shoot. Everything made sense from the colors to the props to the movements. If you enjoyed our sets for this shoot, you'll definitely want to keep your eyes peeled for when our set design course with Moodelier drops in a few weeks. Feel free to check out all of the final work for Benefit here and if you have any questions or if you'd like to see any of the editing process for something specific, let us know in the comments! Thank you so much for reading and as always,
Is it the weekend yet?
Arabela