

Our One Light Setup
Hi friends! Hope you've all had a great Monday. We often get asked what our lighting setup looks like and I thought I would dive into this topic a little bit more. You'd be surprised at how easy it is but it's been our favorite setup for quite some time. Honestly, I think working with one strobe has been our go-to because it's what we're comfortable with and is our way of keeping things simple so that we can truly let the products, sets, and props shine. Lighting can also be incredibly expensive so we've been able to get by with our Profoto D1 500 Air Studio Kit that we purchased almost two years ago. With that being said, we also aim to build out all of our lighting gear now that we're moving into a bigger studio. Hopefully, this will also get us to start experimenting with different setups and more complex lighting techniques.
I'm sure I've mentioned this like a thousand times before but studio lighting has always intimidated me. It still does every now and then but having practiced over the last few years has made me feel a lot more comfortable about it. So if you're scared of artificial light, you are definitely not alone. It just takes time, patience, and lots of practice. I encourage everyone to rent a local studio or find an online store (like Borrow Lenses) that lets you rent out gear for a really affordable price. That's actually how Elle and I were able to try so many different kinds of lighting brands and how we eventually invested in some Profoto strobes.
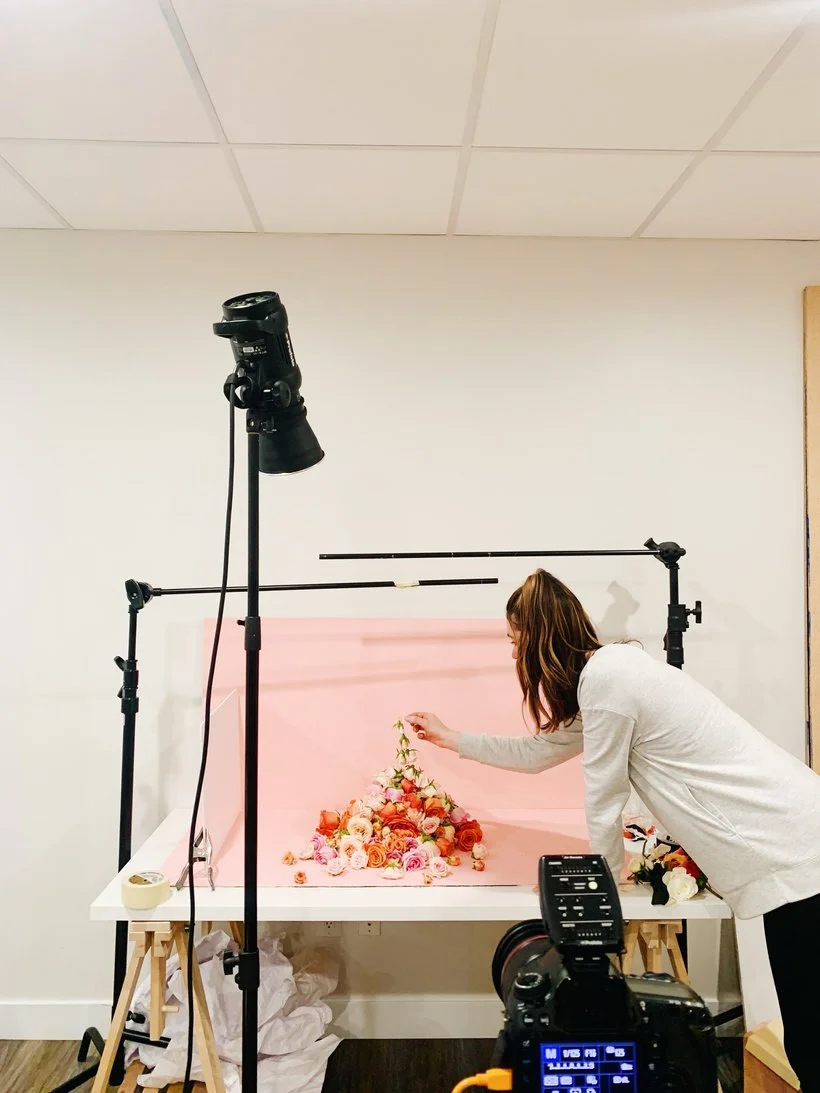
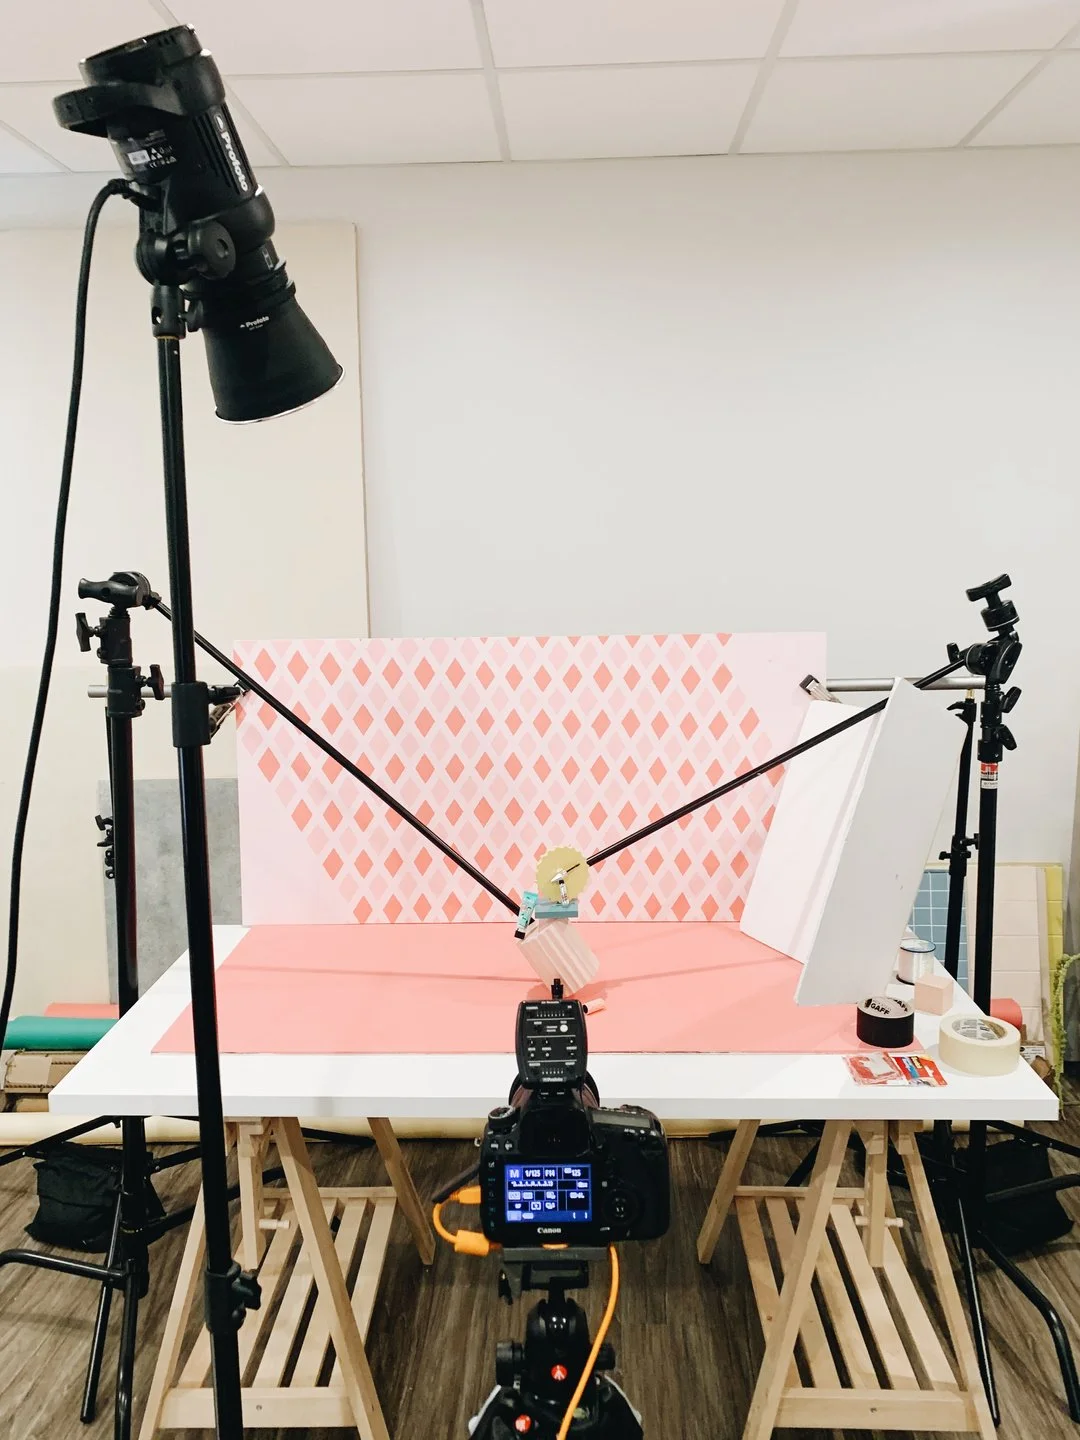
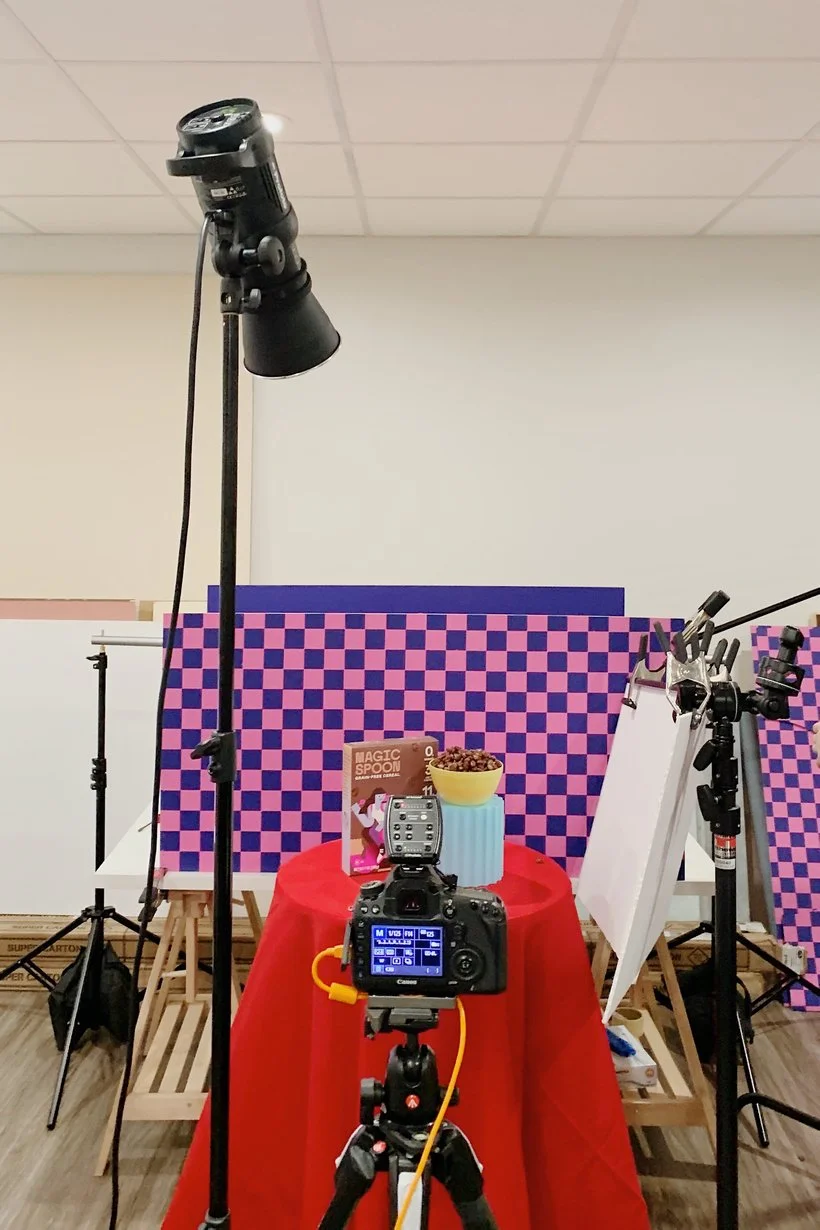
If you don't follow our studio Instagram (Little Sunday Studio), we actually share quite a lot of BTS in that account and you'll be able to get an idea of what our lighting set up usually looks like. But if you're still scratching your head and want to know the deets, I'm here to share them with you. 😉 First, let's start with the actual equipment. As I mentioned before, we use one of our Profoto D1 strobes and we always attach a zoom reflector to help direct the light and create even sharper shadows. Fun fact: We actually used to shoot with a bare bulb for the longest time until we got the reflector about a year into our business. While a reflector is recommended, I would encourage everyone to just shoot with the strobe on it's own to get a feel for shooting hard light. Next, we use our trusty air remote to make sure that our strobe is synced to our camera and can fire off when we take a photo. As for the rest of our gear that we use to shoot, you can check out our entire blog post series all about our gear here, here, and here. Oh, and we definitely have several white cards handy to help reflect some light back into those dark shadows created by the strobe.
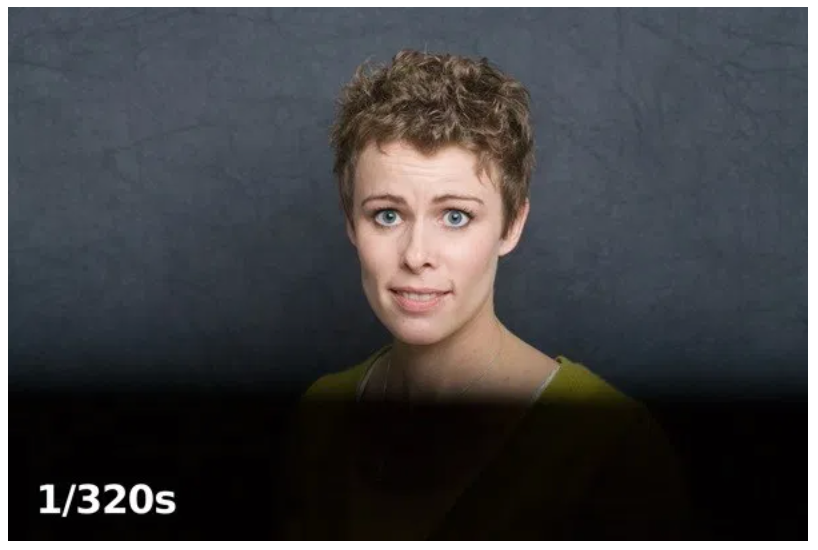
Next, let's talk about our camera settings. I remember one of my very first studio shoots years ago, I could not understand for the life of me why I was getting this weird black bar across the images I was taking. I was still very new to studio lighting and I can remember the panic that washed over my face when I couldn't figure out what was wrong. Eventually, I realized that I needed to keep my shutter speed at or below 1/200 for the black banding to go away. Of course, now I understand why that was happening and it was simply because my shutter speed was too high. When you're working with strobes, you need to be able to keep your shutter all the way open when the flash fires. Otherwise, you're left with those large black bars in your photos. Now this might seem pretty elementary for most studio photographers but if you're just starting to dabble in studio lighting, this is super important to remember or you'll end up really frustrated like I did, haha! I shoot with a Canon so that flash sync speed might be different for other brands so I would make sure to do a quick search to find out what's the highest shutter speed you can be at before you start getting that black band. Below is a quick example of what I mean by black banding that I pulled from this cheesy but great article that explains flash sync speed. (Lol at the model's expression!)
This actually leads me right into what I want to share next: camera and strobe settings. For our one light strobe setup, my go to camera settings tend to be a shutter speed of 1/125, ISO of 125, and an aperture of f/14. I always aim to start here and adjust based on the shoot. Our Profoto D1 strobes have a very simple system of flash intensity. (4 being the lowest and 10 being the highest) For some odd reason, I always choose to start at 6.5 and adjust the power from there. I honestly wish I had a better understanding of how their power range system works but I don't. With that being said, I will take this type of system over any other lighting brand that somehow makes it even more difficult for me to understand, haha! While we do have a light meter, we don't use it as often because we're not using multiple lights and I'm very much a trial and error type of girl when it comes to these technical aspects of lighting.
So, now that we've got our settings down, it's time to position our lights. Sometimes it takes a bit of adjusting to get it right where you want it. For us, we love that harsh shadow look but it can be hard to know where the shadows will fall until we take those first few shots. We also love to treat our shadows as if they were a prop in our scene so getting the light just right is important for them to be a part of the set without "overshadowing" the rest of the products or props. Pun 100% intended. 😅Anyway, here's a quick diagram to show you exactly how we position our strobe.
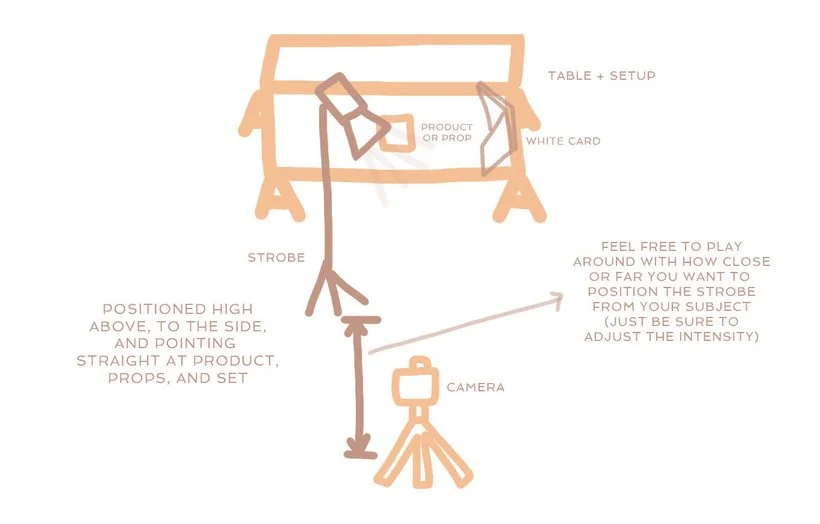
We typically like to position it either to the left or the right of our main set because we love how the shadows fall to the side vs being cast onto the back part of our set. We'll also raise the strobe pretty high above while pointing the light down towards our subject/set to keep the shadows from going wild. Something to note is that if you're going to move your light further away from your subject, you'll have to increase the intensity of your strobe or you'll get a very flat image. For this reason, we try to keep our light decently close to our set so that we don't have to increase the power. And then of course, we can't forget about our trusty white cards to help reflect some light back into the scene. We always position the white card opposite from the side the light is on.
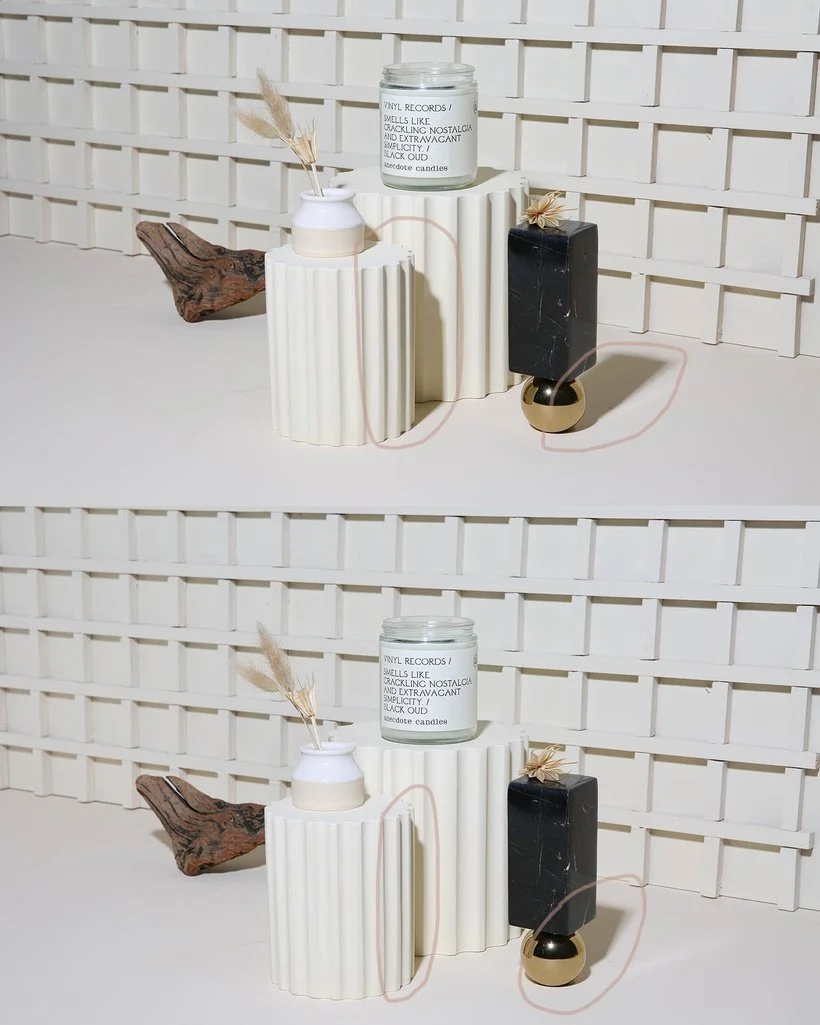
Here's a quick example of how positioning your strobe can be super impactful. As you know, we love our shadows but sometimes they can be a bit distracting if not done right so the top image we had our light positioned too far to the left. Once we moved the strobe closer in, the shadows were still there but they were neatly tucked next to their props and made all the difference.
So, that's pretty much it folks. It's a pretty easy set up that has been awesome for us. We love the look of it and I hope you guys are able to try it for yourselves too! If you have a favorite one light set up that's different from ours, we would love to see it. :) Thank you for reading and if you have any questions, drop a comment below or ask us over in the community.
Is it the weekend yet?
Arabela