

Editing Workflow
Hi all! TGIF, am I right? Hope your October is off to a spooky start. We've got pumpkins all around our space and guess what we're dressing up as for Halloween? Different characters of Michael Scott... I'm going to be Rasta Michael, Elle will be Fun Run Michael, and Kirsten will be Prison Mike. I'm crying just thinking about it. 😂
Alright, enough messing around. Let's get into what this post will actually be about. Haha! I've shown a good amount of our editing workflow through some of our Edit With Me videos but I wanted to share a little bit more of the process, the organization, and what I look to retouch. PSA: This workflow is always a work in progress but I hope it's helpful to you all or at least makes you feel like you're not weird for doing certain things differently. Like we always say when we're hosting Adobe livestreams, there are a million ways to achieve something when editing. At the end of the day, you just have to find what works for you. Let's jump in!
After The Shoot
Since we typically tether the majority of our shoots using Capture One, those sessions of photos will have already been saved to my external hard drive which is awesome. If we happen to shoot somewhere on location, the first thing I do is immediately transfer/save all of the images directly into my hard drive while leaving all of that work in my memory card as well. If anything were to go wrong, I know that I have 2 areas of access for those images. I also won't format the memory card until I've made sure that the work has been edited and delivered to the client.
Quick story time. Last year, we had a client who booked us for a product shoot but ended up changing the entire scope of the project to a lifestyle shoot that took an extraordinary amount of coordination and production. They also didn't want to pay for agency models so they asked us to find friends or people from Instagram which was a nightmare because they all had different schedules. (Ps. This was before we knew how to put our foot down, charge fees for changing the scope, and made it a rule that we would only hire agency models for any projects moving forward. Oh how we've learned since then haha!) So you can imagine how stressful it was to coordinate and shoot so many different people, on different days, and in various locations. It was crazy. The point of this story is that because there was so much going on with all of those shoots, plus several personal shoots of my own that very weekend, I made a huge mistake and somehow lost one of those sessions. YES! I lost photos. To this day, I don't know how exactly it happened but I have a feeling that I may have formatted my card and just simply shot over it with a different session. That was the first time I had ever lost photos in my many years of photographing and it was quite embarrassing. Thankfully, that specific shoot was with a dear friend and they were nice enough to model for us again but man I learned that lesson hard. So, moral of the story: Transfer and backup those images immediately after the shoot because you truly never know.
Image Selection
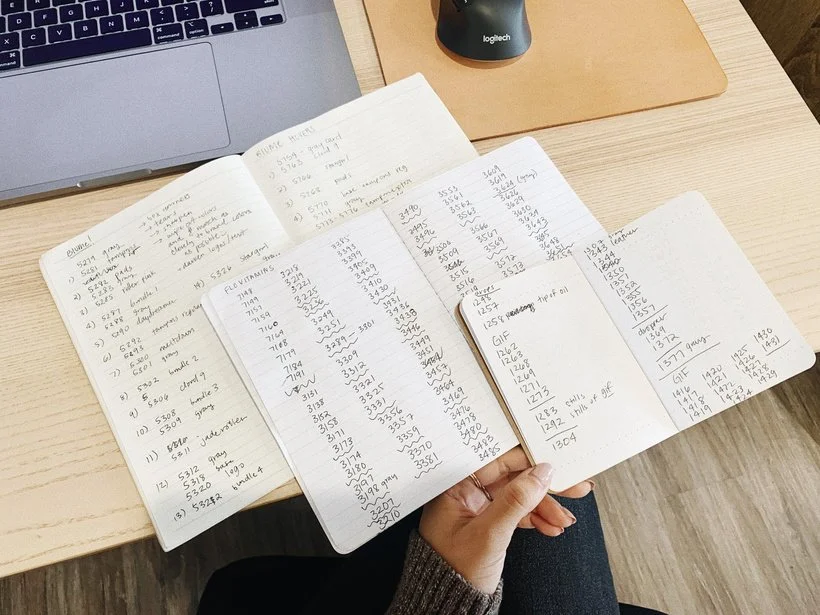
I'm not sure about you guys but I tend to be one of those photographers who likes to wait a day or two before diving into the editing. Most of the time it's because the shoot itself is so draining that I know that I wouldn't be in the right headspace for retouching. The majority of our shoots are also very planned which actually takes care of me having to cull the entire shoot because I know exactly which images I'll be editing. However, for any lifestyle or on location shoots, I will definitely try to cull at least the very next working day because we all know how consuming it can be to narrow down those final images. If you're interested in reading a really old post I wrote about selecting images, you can check that out here. I know there are many ways to cull a shoot. Some like to select their images right in Capture One, others like to rate their shots in Lightroom, and there's no right or wrong way. I say this because I'm a bit old school. I really enjoy the feeling of pen and paper as I'm looking through my photos. There's something tactile and great about using my hands as I exercise my creative brain through culling. I have so many journals filled with columns of file names (numbers). Don't believe me? See below... And those are just a few of them. I've thrown out all of the journals I've filled up over the years.
Once I've selected all of the images that I'll be retouching, I copy the files into a separate folder within that main client folder called "Best" or "Selects." I do my best to keep things as organized as possible so that I can easily find them and get to them. I don't like digital clutter so if I can make my life easier by having some sort of organizational system, I will. 😅

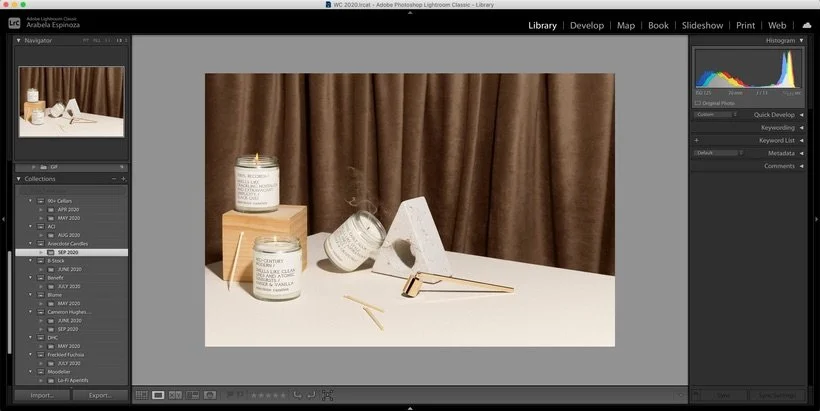
I wasn't always this organized but earlier this year I realized that the longer I take to figure my life out, the more tedious it's going to be to organize down the road so I may as well start implementing certain practices now. Like Lightroom catalog and collections for example. One day, I legitimately sat down and viewed several Youtube videos on Lightroom organization to better understand how it all worked and I just have to say it's made my editing workflow a lot more streamlined.
White Balance + Lens Correction in Lightroom
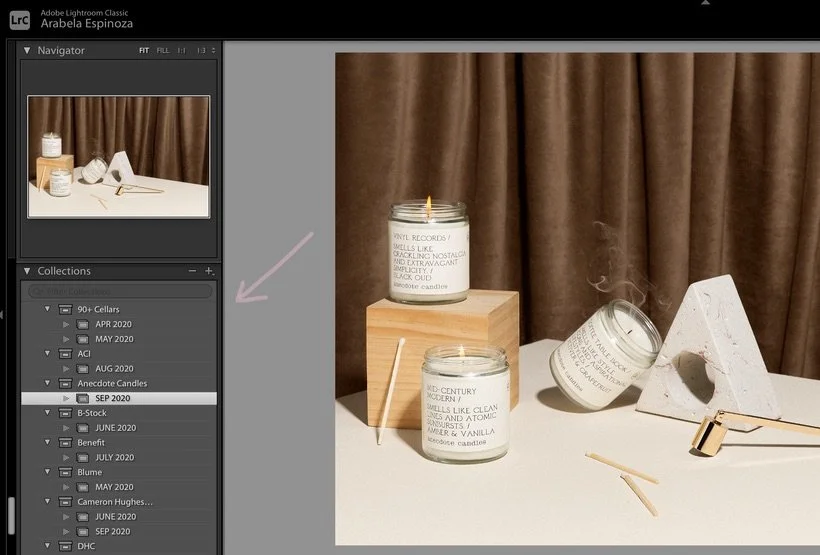
Once I've got all my selects, I import all of those images into Lightroom and immediately organize them into a collection and collection set. It takes less than a couple of minutes but it helps make it easier for me to find the images quickly if I ever need to refer to them again in the future. The collection sets will usually be the client's name and the collections will be the month and year in which the shoot took place.
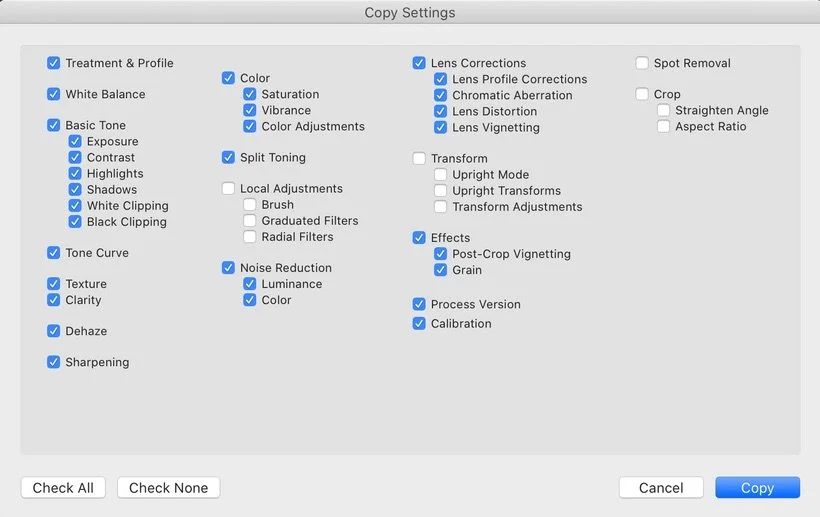
From here, I'll start making some of the basic edits that I've shown in my Edit With Me videos. This mainly includes white balance, lens correction, and chromatic aberration. The reason I make very small changes in Lightroom is because the majority of the post-production will be done in Photoshop. If I'm working on a lifestyle shoot, I might be able to get away with staying in Lightroom but it truly depends on the shoot. One thing that comes to mind that has helped me out a ton is making sure I get several shots with a gray card in the scene for every different set or setting. This eliminates the need to guess at what the correct white balance may be. Once I've made those edits, I'll usually copy the treatment and paste them to other images within the same sets. One thing to remember about copying settings is to make sure you have unchecked what is very specific to that image. For example, if you're working on a shoot that was on location or lifestyle, you might make some localized adjustments in Lightroom that are very specific to that image and won't work at all for the next image. The sections I would suggest to leave unchecked are below:
Compositing + Cropping in Photoshop
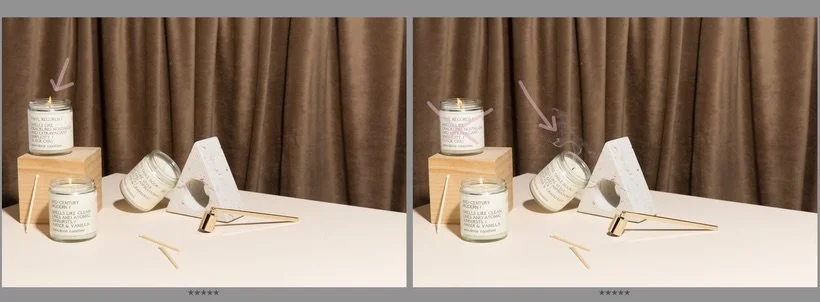
Time to take it over to Photoshop! If you've seen our previous Edit With Me videos, you'll know that I like to start with adjusting the overall geometry of the image. That is still true. However, lately I've found myself having to composite before I start transforming the entire image. For example, we recently shot for a candle company and for one of the shots, we really liked how the smoke was positioned in one image but we also loved how the flames flickered better in another image. So, I took care of compositing the flames that I liked better into the shot with the smoke. Basically, anything that I want to be in the final shot, I want to make sure I'm compositing first before I get ahead of myself and start cropping and warping the entire image. The reason for this is simply because it's easier to just lay the image over and use a layer mask to brush the part of the image that you would like to composite. Of course, this only works if you kept your tripod and camera settings the same but if you didn't, you could always just transform the part you want to add. Like Tim Gunn always says: Make it work!
Now that I've taken care of the compositing, it's time to get all OCD up in here. Just kidding haha! What I meant to say is, time to adjust the overall composition. Sometimes the image may need to be slightly rotated or cropped. Certain products might look like they're slightly leaning and that could be because of lens distortion and how close they are to the edges of the frame. I do my best to make sure all of my lines are as clean as possible so I'll use a combination of the crop tool, transform, warp, and skew. Quick note: I find that it's usually best for me to adjust this before I get into retouching the whole set + products and adding a lot more complicated layers.
Clean Up
Once I've made those adjustments, I typically duplicate my main layer and get started with the cleanup of the entire image. Naming your layers and working in a non-destructive manner will help you be able to go back if changes need to be made. The clean up portion of post-production includes but is not limited to: dust retouching, removing weird imperfections, cleaning the entire set, retouching all of the props, fixing dings on the products, retouching textures in the background, eliminating smudges or fingerprints, fixing product labels or packaging, etc. The tools I typically use in Photoshop to complete the cleaning are the spot healing brush tool, patch tool, stamp tool, liquify, transform, warp, and content-aware tool. And that's just what comes to mind when I'm thinking about product specifically but there's plenty more to be done if working with actual models on set. Don't even get me started with hair and skin. Haha!
Cleaning the entire image can take me anywhere from 45 min to sometimes 1.5-2 hours. It all depends on how many imperfections the set, props, and products had. This is part of the reason we try our best to keep the scenes as clean as possible while making sure we use gloves throughout our shoot to eliminate fingerprints and smudges. We also always require clients to send us multiples of their products so that we don't run into any issues with weird labels.
Colors
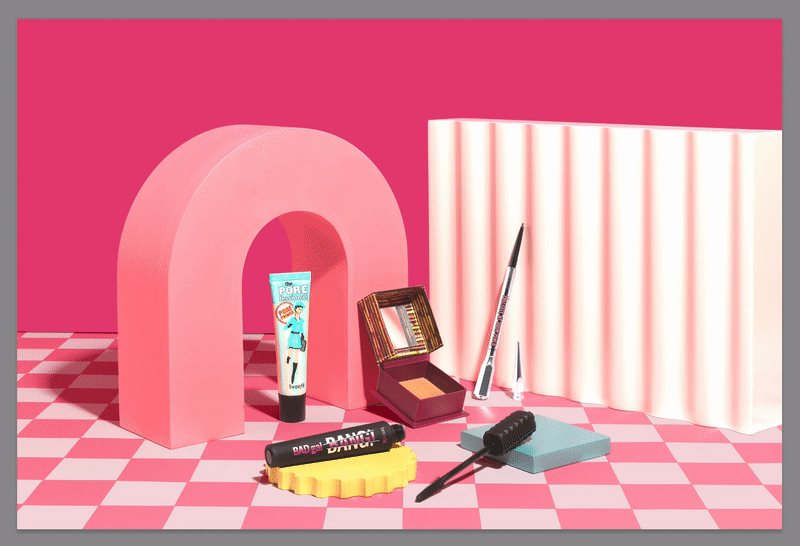
From here, I typically start working on any colors that need to be adjusted as far as the props and the background set go. This can take quite a bit of time because it usually means I'm making very careful selections around the products so as to only effect the colors I'm planning on adjusting. For example, in this Benefit shoot, the client was very adamant that we use the exact colors from their brand guidelines. Of course it's always super hard to match colors in real life but we try to get really close so it's easier to adjust in post. I then spend a lengthy amount of time selecting every prop (and background) and doing a combination of layers and blending modes to get the colors right. It's tedious but it has to be done sometimes!
Dodging & Burning
Once I've taken care of adjusting all of the props and the background colors, I get started on dodging and burning. There are many ways to do this of course and you just have to find what works for you but I always do the same thing for all of my images. When it comes to burning, I typically darken all of the product labels and any products that are black to give it some contrast. When it comes to dodging, I typically brighten up white text, areas that seem a bit dull, shadows that seem too dark, add contrast to skin and so forth. I also really love to use the dodge tool to brighten up some of the props, especially fruits and flowers. Like I mentioned, there are so many ways to achieve this. You may duplicate your layer and just use the actual dodge & burn tools in your toolbar, you could also create a layer with 50% gray on it and then use the D&B tools, or you might use two curves adjustment layers and add layer masks to them and just use the brush tool to paint the areas that you would like to dodge or burn. I would highly consider spending some time learning the different methods and seeing what works for you.
Sharpening + Levels
After I've taken care of dodging and burning the image, I'll jump right into putting some of the finishing touches to the overall image. Of course, while still being as non-destructive as possible and always duplicating my layers. For sharpening, I typically like to use the high-pass sharpening method which I show in our retouching videos but there are other ways to sharpen if you prefer something that isn't as dramatic as the high-pass method. Sometimes, if the image is meant to be softer, I'll only take care of sharpening the labels ever so slightly so that it gives it that extra pop.
And lastly (in Photoshop), I'll take a look at the overall image and see if I need to do any more adjustments on the overall exposure by using a levels adjustment. I know it seems a little out of whack to mess with the exposure near the end but because most of our shoots are tethered, we usually nail the exposure during the actual shoot. I highly recommend doing this because that eliminates having to then worry about blown out areas in your product shots or losing detail in the darks. Making this last adjustment is truly just to add a bit more contrast and slightly bring up the exposure of the overall image. I say this because I recently discovered that a good amount of people who are experiencing images or ads on social through their phones don't typically have their brightness all the way up so it's important to remember this when editing. I always have my brightness up to the highest percentage but maybe that's just me... 😅
Presets + Grain in Lightroom
And that's for the most part how I usually wrap up editing one image and I'll just start the process all over again for each image after that until the whole set is done. However, once I'm done in Photoshop, that doesn't mean I'm entirely done with the editing process. For some projects, I'll actually head back to Lightroom to apply some additional finishing touches and this can include adding certain filters or presets, grain, texture, and more. This varies per project but if I feel that the images could benefit from a slight color adjustment, preset, or texture, I will add it. This also helps with making the images cohesive beyond the colors, props, and set design. I personally love to use the Lightroom plug-in called The Fader to apply a preset but then adjust the opacity of it for a more subtle change.
Exporting
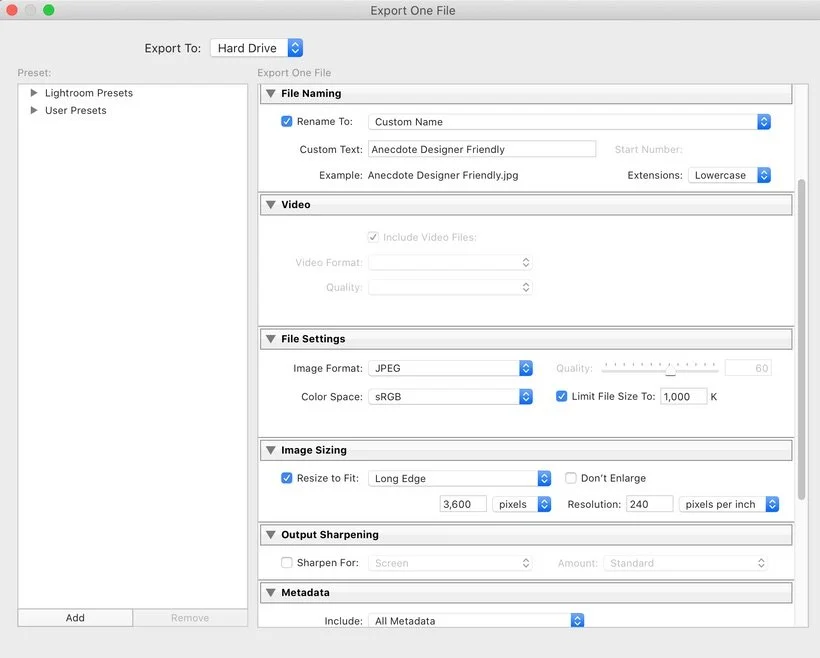
Recently I've been a huge fan of exporting images through Lightroom. It's a lot more seamless and can be done all at once instead of having to save each image individually through Photoshop. For my export settings, it will truly depend on the client's requested dimensions but these are my usual settings that I try to stick to for a high-res JPEG. The key thing for me is to always aim for a smaller file size so that it doesn't take a long time to load onto a website or social while still maintaining quality.
Wow, if you've made it this far. I'm clapping for you through the screen. Haha! 👏🏽Thanks for reading all of that and I totally understand that seeing a video would probably be a lot more useful but I figured it was important to share some of the reasoning behind my workflow that's a bit too long to explain in a video. I feel like videos are better suited for getting right into the action, haha! However, I did want to link some of those retouching videos for you so that you could check them out and see the process live while now knowing my workflow and what my brain is thinking. Check them out here, here, and here. In the meantime, I'll be gearing up for another retouching video for our Saturday and Sunday level members, perhaps how I retouch a certain background or how I create a GIF from start to finish (layer masks and all). Let me know in the comments! :)
Is it the weekend yet?
Arabela